顯示具有 Wireless(802.11) knowledge 標籤的文章。 顯示所有文章

Wireless open system authentication ....


http://www.codealias.info/technotes/performance_evaluation_of_wireless_security_systems_part_2_-_the_802.11_handoff_process

How to test TXBF!!

Settings in the AP and Client
GW-AP w. SDK 1.2.0 installed (Beamformer)

–GUI settings
•NPHYTx/NPHYRx Chains: 3/3 (wl ratesel_nss 3)
•BFR/BFE: Enabled/Enabled (wl txbf 1)
•Mode: Access Point (wl ap 1)
•802.11 Band: 5 GHz (wl band a)
•Channel Specifications: 40/80 (wl chanspec 40/80)
•Bandwidth: 80 MHz

–Commands
•wl txbf_bfr_cap 1
•wl spect 0
•wl mpc 0
•wl spatial_policy 1


§BCM43460 module client (Beamformee)

–Commands
•wl txbf_bfe_cap 1
•wl mpc 0
•wl txchains 1
•wl rxchains 1

Note:
1. configure 3tr BRF to 1 rx BEE
2. disable two streams on BEE

hysical layer info in wireless packet captures


OmniPeek 6.8 (Ralink USB adapter)
In Wireshark, an OmniPeek capture uses an Airopeek header, which looks like this:
             image002.png
Note that Wireshark (as of 1.6.x) doesn’t know how to decode all the wireless metadata in an OmniPeek capture – the same frame viewed in OmniPeek itself shows Signal dBm, Noise Level and Noise dBm:
             image003.png

Applying wireless files as Wireshark columns

It is very often much easier to understand what’s going on with a wireless sniff, if you have applied the wireless fields as columns.  Here’s how to do this:
1. Locate the field of interest in the packet details section (first expanding the applicable header section if necessary) and right-click it.  Select Apply as Column:
        image005.png
2.   The new column appears.  Now you can resize, rename (by right clicking the column header and selecting “Edit Column Details”), and move the column as desired.
3.   Repeat for other columns of interest.  Now you have a better handle on the physical layer aspects of your capture:
     image006.png

4.   Once you’ve applied the new column, the next time you run Wireshark, the column will be available (if you don’t see it, right-click the column headers and select Displayed Columns.)


https://supportforums.cisco.com/document/100116/80211-sniffer-capture-analysis-physical-layer

[Notes] 802.11ac Aps performance compared to Clisco APs.

IxChariot utilized the script "High-Performace_TCP.scr" to generate maximum TCP traffic, while handling downstream traffic.

Each access point was attached horizontally against a dropdown ceiling.

Four different distance and obstruction scenarios were used:

  • 5 feet LOS
  • 30 feet Non-LOS
  • 75 feet Non-LOS
  • 120 feet Non-LOS
Each client device was tested in each set one at a time.
  • a Samsung Galaxy S4, 1SS
  • a MacBook Air notebook, 2SS(Now is 3SS)
  • a MacBook Pro laptop, 3SS
http://www.arubanetworks.com/pdf/technology/TR_Miercom_02Oct2013.pdf


How to enable the WPA2-Enterprise with Win7 client.

1. In Windows, navigate to Control Panel > Network and Internet > Network and Sharing Center.
2. Click Manage Wireless networks.
3. Click Add.
4. Choose Manually create a network profile.
5. On the next page, enter the following:
Network name: This is the SSID name. It is case sensitive.
Security type: Choose WPA2-Enterprise.
Encryption type: Choose AES.
Check Start this connection automatically if you want Windows to connect to this network automatically.
Check Connect even if the network is not broadcasting if the SSID is hidden and you want Windows to connect to this network automatically.
6. Click Next.
If the RADIUS server has a certificate that may not be trusted by the wireless client or is not a member of the domain in which the RADIUS server resides, on the "Successfully added" page, click Change connection settings.
7. Choose the Security tab.
8. Click Settings.
9. Uncheck Validate server certificate if the wireless client may not trust the RADIUS server certificate.
10. For the Authentication Method, choose EAP-MSCHAP v2.
11. Click Configure.
12. Uncheck Automatically use my Windows logon on name and password if the computer is not on the domain.
13. Click OK.
It may be required to specify user or computer authentication based on whether the client is part of the domain or if machine or user authentication is a condition of the RADIUS policy.


To choose user or computer authentication, from the Security tab,
1. Click Advanced settings.
2. Select the 801.X settings tab.
c) Check Specify authentication mode.
d) Choose User or computer authentication. Or choose an alternate option if required.
e) Click OK to close out.

https://kb.meraki.com/knowledge_base/enabling-wpa2-enterprise-in-windows-vista-and-windows-7

Introduction toIEEE 802.11ac manufacturing test requirements

http://m.eet.com/media/1166980/26363-tmw_1206_f3_80211ac.pdf

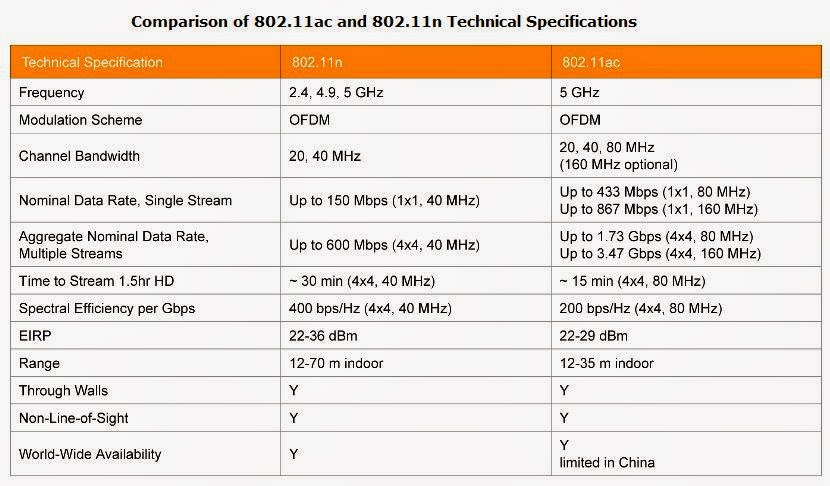
IEEE 802.11ac proposed standard supports data rates that are up to 10 times faster than those of WLAN 802.11n HT (high throughput), and it also specifies a signal bandwidth of up to 160 MHz (four thimes that of 802.11n). In addition, 802.11ac will support MIMO (multiple-input, multiple-oupt) communications with up to eight data streams.

802.11 速度表


WDS (Wireless Distribution System)

WDS (Wireless Distribution System) 指的是以無線網路連接的方式所構成的一個整體網路。WDS又可區分成無線橋接(Bridge)與無線中繼(Repeater)兩種不同的應用。

這兩種應用的不同,區別在於,橋接的目的是為了連接兩個不同的區域網路,橋接兩端的AP通常只與另一端的相對AP溝通,不接受其他無線網路設備的連接,例 如個人電腦。而中繼的目的則是為了擴大同一個區域網路的網路服務範圍,中繼用的AP同時也接受其他無線網路設備的連接。

兩者的共同點是,無線橋接與無線中繼兩者都使用無線網路做為其中間的傳輸連接方式。

例如,有兩個不同的區域網路現在要連接在一起,但又無法以有線網路連接而利用無線網路做連接時,這就可以應用WDS的橋接方式實作了。通常在橋接的實作 中,橋接端的無線設備(AP)多半會被限定成只跟另一端的特定AP連接而不接受其他無線裝置的連接。因為愈多的無線AP連接,愈有可能形成無線網路傳輸迴 圈的複雜情況,因此在設計規劃時必須十分謹慎仔細。

再例如,某一個區域網路想要擴大其網路服務到較遠或是網路無法達到的區域時,利用無線網路AP做為中繼來連接擴展,這就是WDS的中繼方式實作了。最簡單的例子就是在多層樓的建築內佈建無線網路,例如家庭、校園等等。

簡單的說,不管是WDS的橋接或是中繼而言,都是利用了無線網路AP來互相連接,以克服某些網路佈設上的障礙。

達成WDS的必要條件如下:
1. 兩個具有WDS功能的AP
2.
兩個APSSID要相同
3. 兩個AP使用的無線網路頻道必須相同
4. 兩個AP啟動WDS,並互設對方的wireless MAC address
5.
兩個AP的安全機制必須相同

另一個必須考慮的重要條件是,想拿來實作WDS的無線AP最好是同一個廠商的產品,可能的話,甚至最好是同一個型號的產品。原因在於,WDS 並不是一個廣泛共同的標準,也並不是所有的無線AP上都有支援WDS的應用。再者,不同廠商的不同無線產品間,應用WDS的方法也不盡相同。